


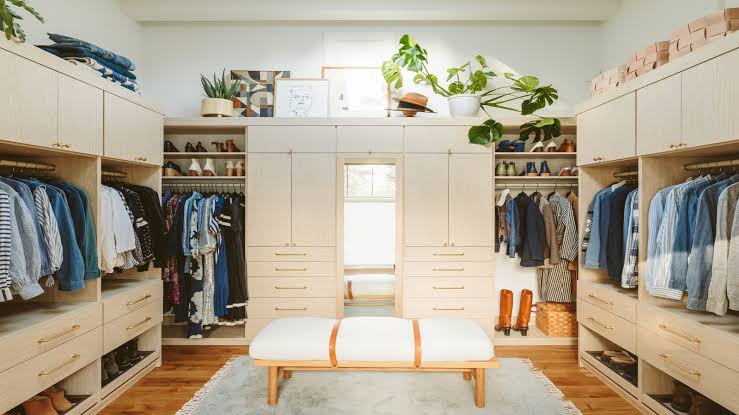
Imagine stepping into a space that feels less like storage and more like your own private boutique. Soft light falls across neatly hung jackets, your shoes sit in a tidy row, and every accessory has a home. Then reality hits: most walk in wardrobe designs get planned in a rush, with rails crammed in wherever they fit and a single bulb doing all the work.
The gap between a cramped closet and a boutique dressing room comes down to three things: zoning, layout, and lighting. Get those right in your wardrobe design, and even a modest footprint can feel indulgent.
In this post, we’ll walk through how to plan each one, with practical wardrobe design tips, and a checklist you can use for walk in wardrobes.
Zoning: Give Every Category Its Own Home
Zoning is the single biggest difference between a boutique feel and a jumbled cupboard. Instead of scattering everything, you group items by type and give each group a dedicated area. Here’s how to break it down.
Hanging Zones
Split your hanging into two heights. Double-hang shorter items like shirts, blouses, and folded trousers on two stacked rails to double your capacity. Reserve a full-height rail for dresses, coats, and anything long.
A quick rule of thumb: allow roughly 40 inches of vertical space for double-hanging and around 60 inches for full-length pieces. Getting these numbers right early saves you from that classic mistake of hems dragging on a shelf below.
Folding Zones
In kitchens wardrobes and bedroom wardrobes, shelves and drawers handle everything you’d rather fold than hang. Use adjustable shelves for knitwear and denim, since stacks vary in height. Reserve shallow drawers for delicates and deep drawers for bulkier items like gym wear.
Keep daily items between hip and eye level, the prime real estate you reach without stretching or crouching. Push seasonal or rarely used pieces to the very top or bottom.
Shoe Zones
Shoes deserve their own dedicated wall or bank of shelves. Angled shelves let you see each pair at a glance, while a mix of shelf heights handles everything from flats to tall boots. If you’re tight on room, a pull-out shoe rack reclaims awkward corners beautifully.
Accessory Zones
This is where a wardrobe starts to feel like a boutique. Add shallow velvet-lined drawers for jewelry, hooks or pull-out rails for belts and scarves, and an open display shelf for handbags. Seeing your accessories laid out, rather than buried, is what makes getting dressed feel like a treat.
Layout: Match the Shape to Your Space
Your room’s dimensions decide which layout will work hardest for you in case of kitchens wardrobes and bedroom wardrobes. The three most common configurations each suit a different footprint, and the smartest wardrobe designs simply pick the one that fits.
Single-Wall Layout
Best for narrow rooms or a section of a bedroom, this runs all your storage along one wall. It’s efficient and affordable, though it limits total capacity. Keep at least 36 inches of clear standing space in front so you can open drawers and step back to see an outfit.
L-Shaped Layout
Perfect for square or corner spaces, an L-shape wraps storage around two adjoining walls. It offers more capacity than a single wall and creates a natural spot for a mirror or seating in the open corner. Just plan the corner join carefully, since that’s where storage can turn into dead space.
U-Shaped Layout
The most generous option, a U-shape lines three walls and turns the room into a true dressing suite. You’ll want a minimum width of around 84 inches so the two facing runs don’t crowd each other. This is where an island, a bench, or a full-length mirror finds its home.
Lighting: The Detail That Sells the Boutique Feel
Lighting is what separates a functional closet from a space that feels expensive. Most walk-ins fail here, relying on one harsh ceiling fixture that casts shadows exactly where you don’t want them. A layered approach fixes that.
Ambient Lighting
This is your base layer, the overall glow that fills the room. Recessed ceiling spots or a soft central fixture work well. Aim for warm-to-neutral white light, roughly 3,000 to 4,000 Kelvin, so colors read true and skin tones look natural when you check an outfit.
Task Lighting
Task lighting targets the spots where you actually do things. LED strips tucked under shelves and inside hanging sections illuminate what would otherwise sit in shadow. A well-lit rail means you can tell navy from black at 7 a.m., a small detail that saves real frustration.
Accent Lighting
This is the boutique flourish. Backlit shelving, a lit display niche for handbags, or a softly glowing mirror surround turns storage into a showcase. Add motion sensors so lights wake up as you enter, and you’ve got that effortless, high-end feel.
Your Pre-Planning Checklist
Before you finalize anything, run through these questions. If you can answer yes to each, you’re ready to build.
- Have you counted your inventory? Hanging items, folded stacks, shoes, and accessories, all tallied.
- Does every category have a zone? No orphaned items with nowhere to live.
- Is daily-use storage between hip and eye level? Prime space for prime items.
- Does your layout suit the room’s shape? Single-wall, L-shaped, or U-shaped, chosen deliberately.
- Have you left enough standing and door-clearance space? At least 36 inches in front of storage.
- Are you layering three types of lighting? Ambient, task, and accent.
- Is your light temperature warm-to-neutral? Around 3,000 to 4,000 Kelvin for true colors.
- Have you planned a mirror, seating, and finishing details? The touches that sell the boutique feel.
Work through this list, and you’ll avoid the mistakes that leave so many walk-ins feeling cramped and dim.
Conclusion
A boutique dressing room isn’t about square footage or a huge budget. It’s about three deliberate decisions: zone your storage by category, choose a layout that fits your room, and light the space in layers. Get those right, and the finishing touches do the rest.
